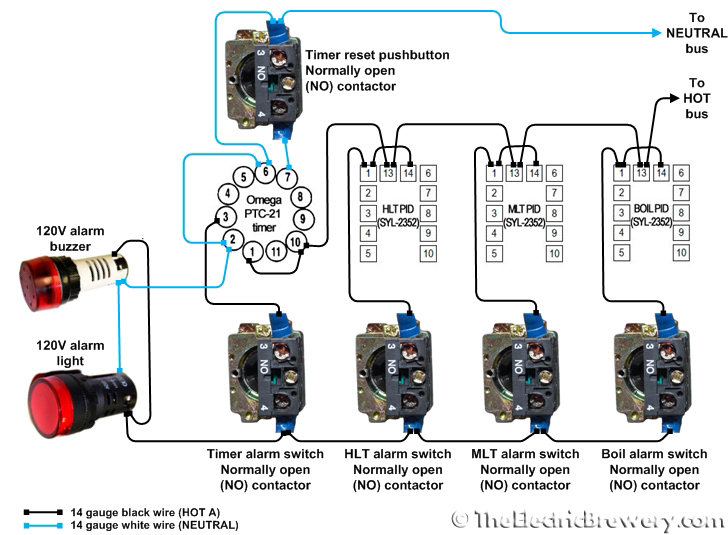
thanks for the response. These alarms are to help monitor the temperature levels of boiling liquid while making beer! AL1 is for high temp (when water reaches near boiling, I will probably set it to about 208* F) and AL2 is for low temp (i don't really have a need for this alarm). The switches below are to enable the alarm for each of the controllers/timer. I am not sure if leaving AL2 disconnected will affect anything, so that may be a possibility. The only thing this will control is a flashing buzzer/light. As far as details on the timer and the controllers, is there anything specific you need to know? I have access to both manuals. If I knew the info or type of info you were after, I could read through the manuals and try and find the info you are looking for. It all looks greek to me... The answer may be simple and right in front of me, but I am still very much a beginner when it comes to this stuff.
As far as a flow chart: I think the writer of the instructions I am following explains it best, so this might help with the purpose of the alarms? Here is a link to the page that has tons of images of what I am trying to build:
http://www.theelectricbrewery.com/contr ... -2?page=11
Here is text copied from that page:
You'll need to change a few settings on the PID controllers for our setup. These are one-time setting changes that are done and saved. The PIDs will remember whatever settings you enter even when powered off.
To modify the settings, hold down the SET button on the PID for 3 seconds to enter programming mode. The up/down arrow buttons are then used to change the current setting. The SET button is used to advance to the next setting. Once done, simply wait 10 seconds. All settings will be saved and the PID will return to the normal operating mode.
For the most part we use the default settings. There are only a few we modify:
Sn: Tells the PID what type of temperature probe is used. Set this to 21 for all 3 PIDs to tell them that we're using RTD type temperature probes.
Pb: This is the temperature calibration offset and is set differently for each PID based on how the specific RTD temperature probe measures. Every probe will have some error associated with it and this Pb setting is used to correct for this error. For example, if the probe measures 1 degree too high, you would set Pb to -1 to correct the error. The critical range brewers care about is typically the 140-160F mash temperature range so if possible, it's best to calibrate to a sample in this range. One way to do this is to use a known good temperature probe (such as the ThermoWorks ThermaPen) submersed in hot water along with the RTD probe. Use the difference between the two numbers to create the Pb offset and repeat for each PID controller. While RTD probes tend to drift less than others, we still recommend re-measuring once a year to make sure the RTD probe and PID combination is still measuring accurately. Note that the offset doesn't care if your PID is set to display temperature in Fahrenheit or Celsius, the offset value is simple added to whatever value is measured.
FILT: This controls a digital filter that is used to smooth out possible noise that may exist when taking temperature readings. The default is 0 (no filter) such that the PID updates the temperature reading as fast possible. We set this to 5 to avoid oscillations between two numbers as the reading crosses over from one value to another. Higher values result in slower response time but this is not an issue in brewing as temperatures move slowly (relatively speaking).
A-M: This controls whether automatic or manual (or both) PID control modes are allowed. The default value of 2 disables manual mode completely and is fine for the Hot Liquor Tank and Mash/Lauter Tun PIDs. For the Boil Kettle PID this should be set to 0 so that both manual and automatic modes can be used. We use manual mode exclusively. Some people may prefer to initially run the PID in automatic mode with a temperature set to just below boiling (like 208F) and turn on the alarm. The alarm will then sound when 208F is reached and the PID can be switched to manual mode to continue with boiling while carefully watching for a boilover.
Some other settings that may be useful:
ALM1: This setting can be used to set a high temperature alarm. As the temperature passes through this set value going upwards our alarm will sound. Useful for knowing when the strike or sparge water temperature is reached in the Hot Liquor Tank, or when we're getting close to boil in the Boil Kettle.
ALM2: This setting can be used to set a low temperature alarm. As the temperature passes through this set value going downwards our alarm will sound. We don't use this ourselves, but it would be useful for brewers who use immersion chillers in the Boil Kettle to know when their yeast pitching temperature is reached.
COOL: The default setting of 10 sets the PID controller into Fahrenheit and heat mode which is perfect for most North American brewers. If you prefer to display temperature in Celsius instead, set this to 2. If display in Celsius you should also set the dP setting to 1 such that 0.1 degree resolution is used. (Unfortunately the dP setting has no effect when the PID is displaying temperature in Fahrenheit).
Other settings exist but these are the only ones that we find important and/or have changed from the default settings. For more information, refer to your PID controller manual.
Thank you again for your time!
Al